Hurrah, you’ve made it to my website. Perhaps I may surmise that you have come via my new Redcoat History podcast? If so I wish you a hearty welcome. Here – take my canteen, slip off those old leather boots and warm your hands by the fire.
Actually, scrap that – a runner has just come in with news of a Zulu Impi approaching. Put your boots back, give me back that canteen. Is your rifle loaded? Good – get back in the firing line while I pack my cart and make for Helpmakaar.
Oh, you are still here? OK, well, in that case, I want to share with you some video clips and images that will help you to better visualise my latest podcast episode about the battle of Isandlwana – that much-discussed massacre of over a thousand Victorian-era British and Empire troops in January 1879.
If you haven’t yet listened to the episode then you can do so here, via apple podcasts here or on Spotify. Or of course you can press play on the embedded player below:
Oh, by the way, do stick around until the end of this post for my bibliography/recommended reading list.
And if you can’t get enough of my voice and smug-mug then below you will find the rather badly made film I put together when I visited a few years ago.
OK, OK so I also promised maps…Well, how about this fancy one of the camp layout that I tried to make myself?
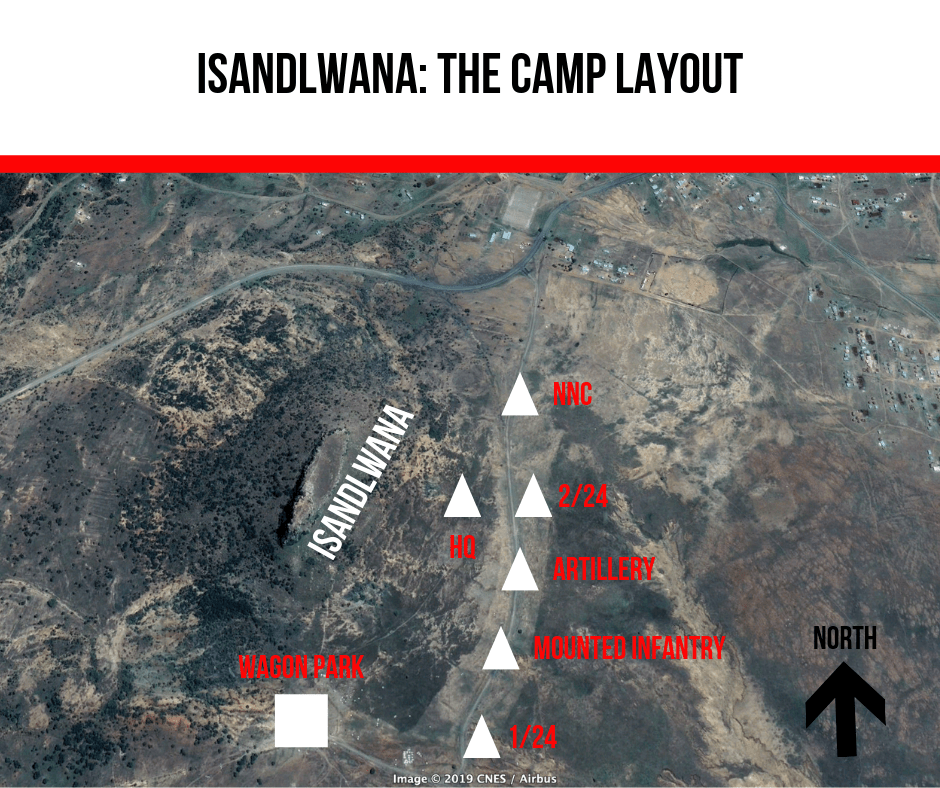
So that should give you a basic idea of the geography of the area and the location of the different units in the camp – the 1/24th at the south with the Natal Native Contingent on the far north of the line.
The map below gives a good overview of the movements of all the major players in the run-up to and during the battle of Isandlwana. I unceremoniously expropriated without compensation this image from a post on the website of the excellent South African Military History Society.

So as the battle commenced I want to give you a taste of the action from the film Zulu Dawn. While not perfectly accurate it does seem pretty good to me:
Actually, as we’ve come all this way together it would be rude not to watch the end of the battle:
So as the battle approached it’s climax what were the dispositions of the British troops? Well, I’m glad you asked as I’ve made this handy map:
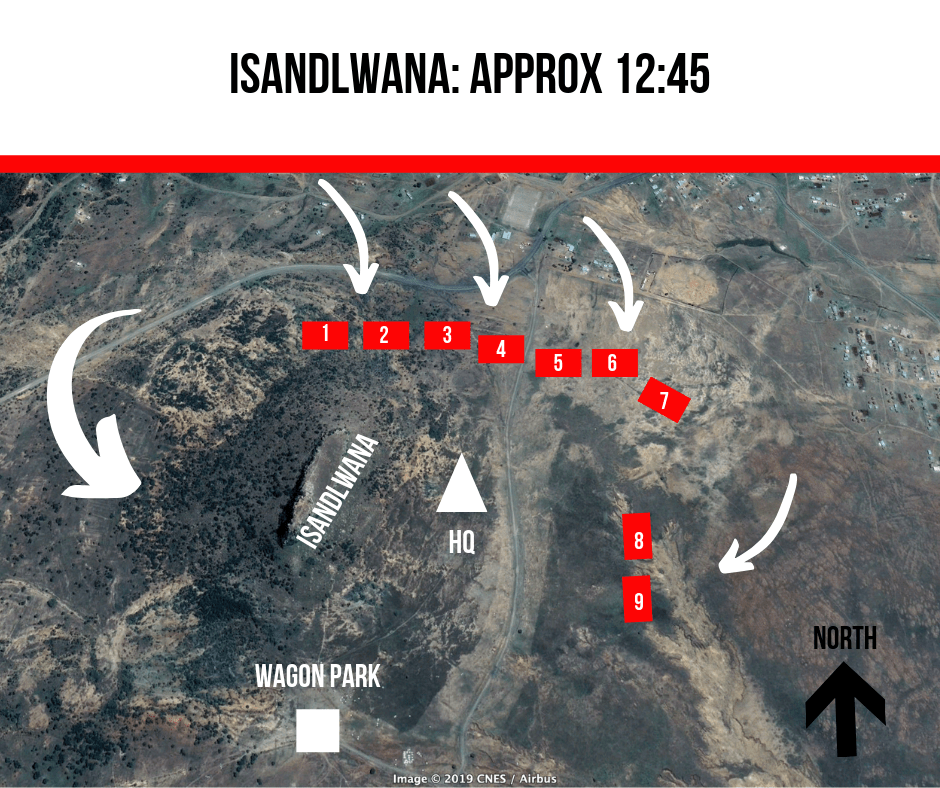
Here is the key:
1 – C Company 1/24th commanded by Younghusband
2 – F Company 1/24 commanded by Mostyn
3 – E Company 1/24 commanded by Cavaye
4 – Elements of the Native Horse
5 – A Company commanded by Porteous as well as the Royal Artillery element
6 – H Company 1/24 Commanded by Wardell
7 – G Company 2/24 Commanded by Pope
8 – Durnford’s Native Horse
9 – Mounted contingent under Bradstreet
Minutes later the line began to collapse as the Zulus used the gap between Pope and Durnford to began infiltrating into the camp.
Trying to withdraw across broken ground and into the camp, even for well-trained, disciplined troops was a big ask as the Zulus swarmed around them. I think the painting below gives a great sense of the chaos that engulfed the battlefield. It was painted by Charles Fripp.

According to the National Army Museum, Fripp travelled to Zululand in March 1879 as the ‘special artist’ for The Graphic, a weekly illustrated newspaper. When he visited the battlefield four weeks after the defeat, bodies still lay unburied and rotting on the ground.
The painting was recently restored by the National Army Museum and there is a short film about the work, which you can watch below:
Fugitives trail:
So as the battle began to end a number of men were able to make a dash for safety, trying to evade both the left and right horns as they met behind the mountain.
It’s a long, steep climb and a dangerous dash across the Buffalo river. I walked the trail a couple of years ago and made this film of the journey that will hopefully give you a good sense of the geography:
Bibliography:
So if you are a fellow military history geek you probably want to know what books I used for the majority of my research for this episode.
Well, there were literally dozens, but I’ll just add a small list below of those that I leaned on the most and would recommend that you buy…Talking of which if you purchase from these Amazon links then they’ll throw me some change and it will not cost you any extra – a win, win!
My favourite book about the battle is Philip Gon’s The Road to Isandlwana – I can only assume it is now out of print as Amazon only seem to offer second hand copies
The other book I highly recommend is Zulu Rising by Ian Knight, it’s fantastically detailed about the battle from both the British and the Zulu perspectives
I’d also like to give a heartfelt mention in despatches to Keith Smith and his book Dead was Everything.
And also to my favourite contemporary account of the battle by the indefatigable Commandant Hamilton-Browne of the NNC who left us the wonderful work A Lost Legionary in South Africa, which can be purchased below or, as it is out of copyright, downloaded from archive .org.
So that is about it from me, if you enjoyed this post then please follow me on social media where I am @redcoathistory on both Twitter and Instagram.
I’ll also be adding a mailing list soon – but I want to write all of my notes up into a short book so that I can give it to you for free when you sign up. Watch this space!
Anyway please stick with the podcast because in Episode Three we will be crouching behind the mealie bags as the Zulu reserve sweep across the Buffalo River and attack our supply base at the Rorke’s Drift mission station…It’s stirring stuff. I’ll see you there.

I’ve really enjoyed the first three episodes of the podcast! You make the story very easy to understand and follow, and you are pretty fair in your evaluations of the strengths, weaknesses, successes and mistakes of both the British and the Zulus.
I recently read Saul David’s book on the Anglo-Zulu war and came away with the impression that the British, most notably Frere, were the instigators and the aggressors in the war, and that Cetshwayo went as far as he reasonably could to avoid the war. Frere comes across as a careerist who was looking to make his name and legacy by conquering Zululand for the British Empire. I would love your thoughts on that as you continue the series.
I would also love to hear a bit about how the Anglo-Zulu war affected British relations with the Afrikaners and whether, and to what extent, the events of the Anglo-Zulu war contributed to the Boer Wars.
Please keep up the great work!
LikeLike
Thanks Scott, appreciate the feedback. I think your assessment of Frere and British aggression correlates with the reading I’ve done also. Sadly I don’t think it could be classed as a “just” war. With regards the Afrikaaners – I think we had our own separate issues with them due to the recent annexation of the Transvaal – I think the defeat at Isandlwana made them realise that the British were far from unbeatable and may have sped up hostilities. Episode 4 is out today and covers the siege and relief of Eshowe.
LikeLike
Just discovered this series – two episodes in, I’m hooked for the long run! One observation – I really squirmed at your mental gymnastics to describe in metric measurements the spacing of the (Very) Thin Red Line; use feet and inches for goodness’ sake!
LikeLike
I’m afriad I know nothing of feet and inches – I grew up with metric. Thanks though and I’m glad you like the podcast.
LikeLike